The best way to tap a hockey stick: Simple stepThere are unique ways to tap a goalie stick often done to tap the stick.The stick uses a lot of tape.There are three places on the stick that are taped: the blade, the paddle grip, and the knob.
The best way to tap a hockey stick: Simple step
Taping a goalie stick is a crucial skill for any hockey player, as it enhances grip, protects the blade, and improves puck control. While the process is similar to taping a regular hockey stick, goalies often use wider tape to reduce weight. Here’s a simple, step-by-step guide to help you tape your goalie stick like a pro:
- Remove Old Tape and Smooth the Surface
Start by peeling off any old tape from the blade and handle. Check for rough spots or debris on the stick and smooth them out to ensure a clean surface for the new tape. - Choose the Right Tape and Color
Select a high-quality hockey tape in your preferred color. Most goalies use wider tape (2-3 inches) to cover more surface area with fewer layers, which helps reduce the stick’s weight. - Decide on a Base Layer (Optional)
Some goalies prefer to add a flat base layer of tape for extra durability. If you choose this option, apply a single layer of tape smoothly across the blade before moving to the next step. - Tape from Toe to Heel
Begin taping at the toe (the front tip) of the blade and work your way toward the heel (the back end). Overlap each strip slightly to ensure full coverage and maximum protection. - Smooth and Secure the Tape
Once the blade is fully covered, press down firmly on the tape to remove any air bubbles or wrinkles. This step ensures the tape adheres properly and lasts longer during gameplay. - Apply Wax for Enhanced Performance
Finish by rubbing a layer of wax over the taped blade. This improves puck control, reduces water absorption, and extends the life of the tape.
Taping a hockey stick is an essential skill for players of all levels. It not only improves grip and puck control but also protects the blade from wear and tear. Whether you’re a beginner or a seasoned player, learning the right way to tape your stick can make a significant difference in your game. In this guide, we’ll walk you through the best methods to tape a hockey stick, step by step, ensuring your stick is ready for peak performance on the ice.
Why Tape Your Hockey Stick?


tap a hockey stick
Taping your hockey stick serves three primary purposes:
- Improved Grip: Tape provides better control over your stick, especially when your gloves are sweaty or wet.
- Puck Control: A taped blade offers better puck handling, allowing for smoother passes and shots.
- Protection: Tape shields the blade from damage caused by ice, sticks, and pucks, extending the life of your stick
Essential Materials for Taping
Before you start, gather the following materials:
- Hockey Tape: Cloth tape is the most common choice due to its durability and grip.
- Scissors: For trimming excess tape and achieving a clean finish.
- Wax (Optional): Applying wax to the blade tape can repel moisture and improve puck control.
Preparing Your Stick for Taping
Proper preparation ensures a smooth and long-lasting tape job:
- Clean the Blade: Remove any old tape residue using warm water, soap, or a hairdryer to soften the adhesive.
- Inspect for Damage: Check the blade and shaft for cracks or splinters before taping.
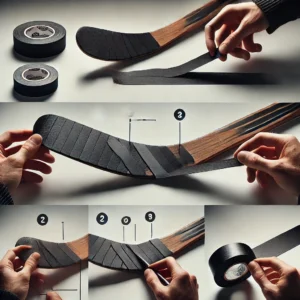
Taping the Blade: Step-by-Step
The blade is the most critical part of your stick to tape. Here’s how to do it:
- Start at the Heel or Toe: Begin taping from the heel (where the blade meets the shaft) or the toe (tip of the blade), depending on your preference14.
- Overlap the Tape: Wrap the tape around the blade with a slight overlap (about 1/4 inch) to ensure full coverage.
- Finish Smoothly: End the tape job on the backhand side of the blade for a clean finish.
Popular Blade Taping Methods
Different taping methods suit different playing styles:
- The Classic: Covers the blade from heel to toe, leaving the very tip exposed.
- The Sock: Fully covers the blade, including the toe, for maximum protection.
- The Toe Cap: Focuses on taping the toe, ideal for quick wrist shots.
Taping the Handle: Creating a Secure Grip
A well-taped handle ensures your stick doesn’t slip during play:
- Create a Knob: Wrap tape around the top of the shaft to form a knob. The size depends on your preference.
- Spiral Down the Shaft: Wrap the tape diagonally down the shaft for added grip612.
- Add a Candy Cane Twist (Optional): Twist the tape into a rope and spiral it around the shaft for extra texture.
Advanced Taping Techniques
For players looking to customize their tape job:
- Spiral Pattern: Wrap the tape in a spiral around the blade or shaft for a unique grip.
- Two-Strand Method: Wrap two strands of tape around the blade for a minimalist look.
- Colored Tape: Use colored tape to personalize your stick or match your team’s colors.
Maintaining Your Tape Job
To keep your tape job in top condition:
- Inspect Regularly: Check for wear and tear after each game.
- Re-tape as Needed: Replace the tape when it becomes frayed or loses its grip.
- Apply Wax: Waxing the blade tape repels moisture and extends its lifespan
Pro Tips for the Perfect Tape Job
- Consistency is Key: Maintain even spacing and tension while taping to avoid wrinkles.
- Experiment: Try different methods to find what works best for your playing style.
- Use Quality Tape: Invest in high-quality hockey tape like Renfrew or Howies for better durability
Why Taping Your Hockey Stick Matters
Taping your hockey stick is more than just a routine—it’s a game-changer. Proper taping enhances your grip, allowing for better control during shots, passes, and stickhandling. It also protects the blade from cracks and chips caused by hard shots or rough play. Additionally, the right taping technique can improve puck feel and accuracy, giving you an edge over your opponents.
Materials You’ll Need
Before you start, gather the following materials:
- Hockey tape (cloth or grip tape)
- Scissors or a tape dispenser
- Wax (optional, for added durability and puck control)
- A clean, dry hockey stick
Step-by-Step Guide to Taping Your Hockey Stick The best way to tap a hockey stick
1. Remove Old Tape and Clean the Stick
Start by peeling off any old tape from the blade and handle. Use a cloth to wipe away residue or dirt, ensuring the surface is smooth and clean. This step is crucial for proper adhesion of the new tape.
2. Tape the Handle (Optional)
If you prefer a better grip on the handle, start by taping it. Begin at the top of the stick and wrap the tape diagonally downward, overlapping each layer slightly. Continue until you reach the desired length, then secure the end firmly.
3. Tape the Blade
- Start at the Toe: Begin taping at the toe (the front tip) of the blade.
- Wrap Toward the Heel: Wrap the tape around the blade, moving toward the heel (the back end). Overlap each layer by about half the tape’s width to ensure full coverage.
- Cover the Entire Blade: Continue taping until the entire blade is covered, including the edges.
4. Smooth the Tape
Once the blade is fully taped, press down firmly to remove any air bubbles or wrinkles. This ensures the tape adheres properly and lasts longer during gameplay.
5. Add Wax for Durability (Optional)
For added protection and improved puck control, rub a layer of wax over the taped blade. This step also helps repel water, keeping the tape in better condition.
Tips for Effective Stick Taping
- Use cloth tape for the blade and grip tape for the handle, depending on your preference.
- Experiment with tape patterns (e.g., toe-to-heel or heel-to-toe) to find what works best for you.
- Replace the tape regularly to maintain optimal performance and protection.
Common Mistakes to Avoid
- Using Too Much Tape: Excess tape can add unnecessary weight and affect your stick’s balance.
- Skipping the Wax: Wax not only improves puck control but also extends the life of the tape.
- Ignoring the Handle: A well-taped handle provides better grip and control, especially during intense gameplay.
Conclusion
Taping your hockey stick is a simple yet impactful way to enhance your performance on the ice. By following these easy steps, you can ensure your stick is well-protected, comfortable to use, and optimized for peak performance. Whether you’re preparing for a game or practicing your skills, taking the time to tape your stick correctly will pay off in the long run. So grab your tape, follow this guide, and get ready to dominate the ice.
Related articles
How many periods in hockey game? simple explain
FAQS
Why is taping a hockey stick important?
Taping a hockey stick improves grip, protects the blade, and enhances puck control. It also helps players customize their stick for better handling and durability.
2. What type of tape should I use for my hockey stick?
Cloth hockey tape is the best choice because it provides a strong grip, absorbs moisture, and adheres well to the stick. Some players also use friction or grip tape for extra control.
3. How do I tape the blade of my hockey stick properly?
Start at the heel and wrap the tape tightly around the blade towards the toe, overlapping each strip slightly. This ensures durability, better puck handling, and a consistent feel.
4. Should I tape the handle of my hockey stick?
Yes, taping the handle improves grip and control. Many players add a knob at the top and use spiral wraps down the shaft for a comfortable, non-slip grip.
5. How often should I re-tape my hockey stick?
It depends on usage, but most players re-tape their stick when the tape starts peeling, losing grip, or getting wet. Regularly changing the tape keeps your stick in top condition.